Unlock Flavor & Longevity: Your Guide to Homemade Garlic Flakes & Dried Minced Garlic
Imagine reaching for garlic in your pantry, only to discover it’s sprouted, soft, or completely gone. Frustrating, right? What if you could always have potent, flavorful garlic on hand, without the worry of spoilage or the need for constant grocery runs? The answer lies in mastering the art of homemade garlic flakes and dried minced garlic. This comprehensive guide will show you
how to make garlic flakes and dried minced garlic using three simple, effective methods – a dehydrator, your oven, or even just air – transforming fresh cloves into pantry staples that elevate your cooking.
Why Make Your Own Dried Garlic? The Benefits Beyond Convenience
Making your own dried garlic isn't just a fun kitchen project; it's a savvy move that brings a host of advantages over store-bought alternatives and even fresh garlic in certain applications.
Cost-Efficiency and Quality Control
One of the most compelling reasons to dehydrate your own garlic is the significant cost savings. Bulk garlic cloves are often incredibly affordable, especially when compared to small jars of pre-packaged dried garlic, which can be surprisingly expensive. By processing your own, you transform a budget-friendly ingredient into a long-lasting, value-added product. Furthermore, you gain complete control over the quality. You choose the freshest, most aromatic garlic, ensuring a superior end product that bursts with natural flavor. For more insights on maximizing your ingredients' lifespan, you might find
Extend Shelf Life: Make Your Own Flavorful Garlic Flakes & Minced particularly useful.
Say Goodbye to Fillers and Preservatives
Have you ever looked at the ingredient list on a jar of store-bought dried garlic? You might be surprised to find anti-caking agents like silicon dioxide or other obscure additives. When you make your own garlic flakes and dried minced garlic, the ingredient list is beautifully simple:
garlic. This purity means you're offering your family and yourself a cleaner, more natural product, free from unnecessary chemicals and fillers that can dull flavor or impact your health. The unadulterated taste of your homemade version will truly shine through in your dishes.
Unlocking Extended Shelf Life
Perhaps the most practical benefit of dehydrating garlic is its dramatically extended shelf life. Fresh garlic, while wonderful, is prone to sprouting, molding, or drying out within weeks. Dehydration works by removing the water content that bacteria, yeasts, and molds need to thrive. This process effectively halts spoilage, allowing you to store your homemade garlic flakes and dried minced garlic for months, even up to a year, without refrigeration. This means you’ll always have garlic ready to go, preventing waste and ensuring your culinary plans are never thwarted by an empty or spoiled garlic bin.
Step-by-Step Guide: Preparing Your Garlic for Dehydration
Regardless of the drying method you choose, proper preparation is key to achieving uniformly dried, flavorful garlic flakes and minced garlic.
Peeling Garlic Cloves with Ease
The first hurdle for many is peeling garlic. While tedious, there are tricks to make it much faster:
- The Shake Method: Place several cloves in two bowls of the same size, inverted to form a sphere, or in an airtight jar. Shake vigorously for 15-30 seconds. The skins will often separate and loosen.
- Quick Blanch: Drop cloves into boiling water for 10-15 seconds, then immediately transfer to an ice bath. The skins will loosen and become much easier to peel.
Once peeled, ensure your garlic cloves are clean and free of any bruised or discolored spots.
Achieving Perfect Slices for Flakes
For garlic flakes, uniformity in thickness is paramount for even drying.
- Mandolin Slicer: This is your best friend for consistent, thin slices. Aim for a thickness between 1/16 and 1/8 inch (about 1.5-3mm). This ensures quick drying and a crisp texture. Exercise extreme caution when using a mandolin.
- Sharp Knife: If you don't have a mandolin, a very sharp knife and a steady hand can achieve good results. Take your time to cut thin, even slices.
Thicker slices will take significantly longer to dry, and uneven slices will result in some pieces being done while others are still moist, risking spoilage.
Mincing Garlic for the Dried Variety
If you prefer dried minced garlic over flakes, your preparation differs slightly:
- Food Processor: This is the quickest way to mince a large quantity of garlic. Pulse the peeled cloves a few times until finely minced. Be careful not to over-process, as you want distinct small pieces, not a wet paste.
- Sharp Knife: For smaller batches, a sharp chef's knife can do the job. Chop the garlic finely until it reaches your desired minced consistency.
Ensure your minced garlic is spread out thinly during the drying process, as clumps will retain moisture.
Mastering the Dehydration Process: Three Proven Methods
Now that your garlic is prepped, let’s explore the three effective ways to transform it into shelf-stable flakes and minced garlic. For a deeper dive into these methods, check out
DIY Garlic Flakes: Dehydrator, Oven, Air Dry for Perfect Results.
Method 1: The Dehydrator – Precision and Efficiency
A food dehydrator offers the most controlled and efficient way to dry garlic, preserving its flavor and aroma beautifully.
- Preparation: Arrange your garlic slices or minced garlic in a single, thin layer on the dehydrator trays. Ensure there's adequate space between pieces for air circulation. Do not overlap.
- Temperature & Time: Set your dehydrator to 66ºC (150ºF). The drying time typically ranges from 6 to 8 hours. In very humid environments, it might take a bit longer, possibly up to 10-12 hours.
- Checking for Doneness: Garlic is fully dehydrated when it’s brittle and snaps easily when bent. It should feel completely dry to the touch, with no pliability or moisture. If it bends, it needs more time. Rotate your trays periodically for even drying.
Method 2: The Oven – Accessible and Effective
If you don't own a dehydrator, your oven can be an excellent alternative, though it requires a bit more vigilance.
- Preparation: Line baking trays with parchment paper. Spread your garlic slices or minced garlic in a single, thin layer.
- Temperature & Time: The key here is low heat. Set your oven to its lowest temperature, ideally between 54-66ºC (130-150ºF). If your oven doesn't go that low, set it to the lowest possible temperature and prop the oven door open a few millimeters with a wooden spoon. This allows moisture (steam) to escape, preventing the garlic from cooking rather than drying.
- Checking for Doneness: Bake for 30 minutes, then check every hour. Drying can take anywhere from 2 to 6 hours, depending on oven temperature, garlic thickness, and moisture escape. The garlic should be crispy and brittle, snapping easily. If it's still flexible, return it to the oven. Be careful not to brown or toast the garlic, as this will change its flavor.
Method 3: Air Drying – The Traditional Approach
Air drying is the simplest method, requiring no special equipment, but it is the slowest and most dependent on environmental conditions.
- Preparation: Spread garlic slices or minced garlic in a single layer on clean baking sheets or mesh screens. Place them in a well-ventilated area. Near a window with good airflow and some sunlight can accelerate the process, but direct, intense sunlight can sometimes "cook" the garlic, so indirect light is often better.
- Conditions: This method is best suited for dry, warm climates with low humidity. High humidity will significantly prolong drying time and increase the risk of mold.
- Time & Care: Air drying can take anywhere from 2 to 7 days, or even longer, depending on the thickness of your garlic, temperature, and humidity. Turn the garlic over once or twice a day to ensure even drying and prevent sticking. The garlic is ready when it's completely dry, brittle, and snaps easily.
Storing Your Homemade Garlic Treasures for Lasting Freshness
Proper storage is crucial to maintain the quality and extend the shelf life of your homemade garlic flakes and dried minced garlic.
The Golden Rules of Storage
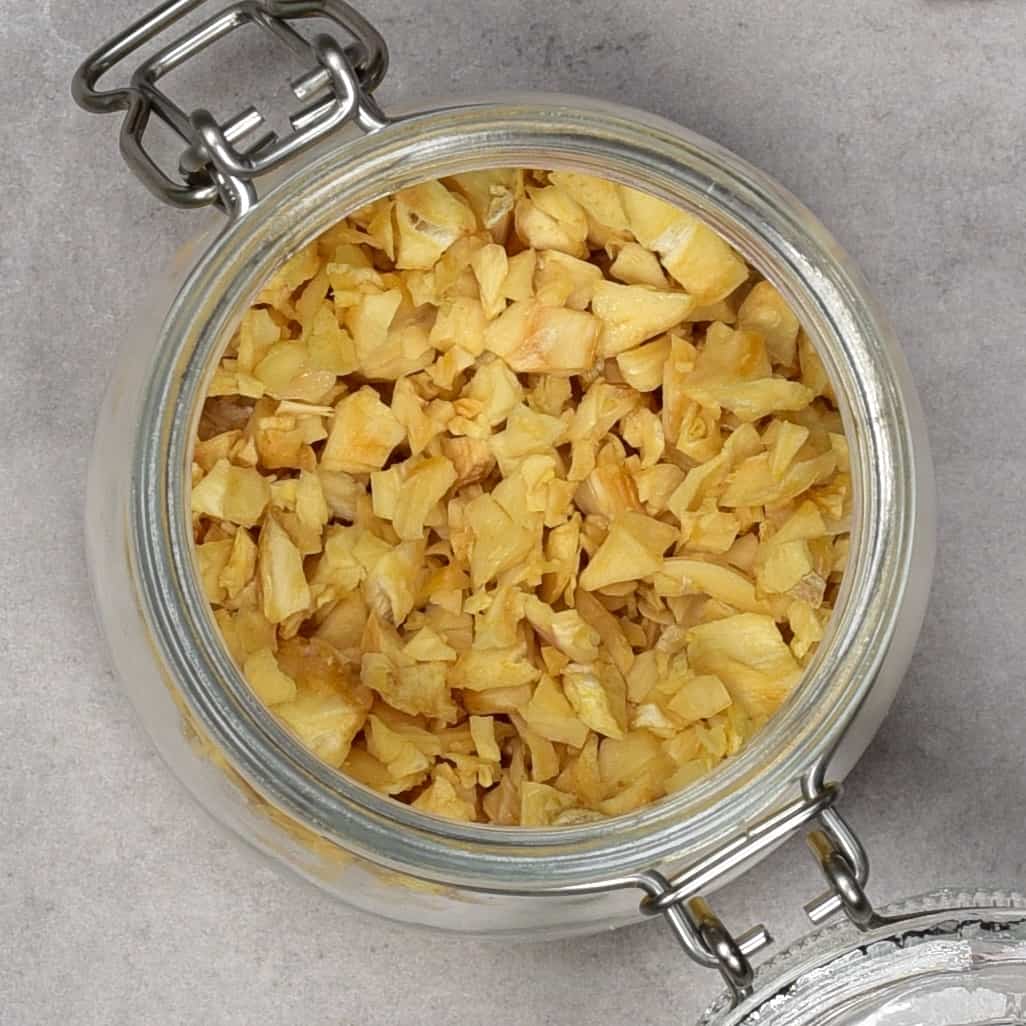
- Cool, Dry, Dark Place: Store your dried garlic in an airtight glass jar or container. Humidity is the enemy, so a cool, dry, dark pantry or cupboard is ideal. Avoid direct sunlight or areas prone to temperature fluctuations.
- Humidity Control: To absorb any residual moisture and prevent clumping, you can add a tablespoon or two of uncooked rice or dry beans to the bottom of your jar. These act as natural desiccants.
- Check for Moisture: After a few days of storage, check your jar for any condensation. If you see moisture, it means your garlic wasn't completely dry. Re-dehydrate it using one of the methods above until fully brittle.
While dried garlic is incredibly long-lasting, its potency can gradually diminish over time. For best flavor, aim to use your homemade garlic flakes and minced garlic within the first year. Labeling your jars with the date of preparation is a good practice.
Creative Uses for Your Dried Garlic
Once you have a stash of homemade dried garlic, the culinary possibilities are endless:
- Directly in Cooking: Add flakes or minced garlic directly to soups, stews, marinades, roasts, or any dish where you'd use fresh garlic. They rehydrate and release their flavor as they cook.
- Rehydration: Soak flakes in warm water for 15-20 minutes to rehydrate them before adding to salads, dressings, or dishes that don't have a lot of cooking liquid.
- Grind into Powder: Use a spice grinder or mortar and pestle to transform your flakes into homemade garlic powder, another incredibly versatile spice.
- Garnish: Crisp flakes make an excellent garnish for roasted vegetables, pasta, or even homemade bread.
Conclusion
Learning
how to make garlic flakes and dried minced garlic at home is a rewarding endeavor that empowers you with flavorful, natural ingredients year-round. By investing a little time in preparation and dehydration, you'll not only save money and avoid unwanted additives but also ensure you always have that essential aromatic kick readily available in your pantry. So, grab some fresh garlic, pick your preferred method, and start creating your own culinary staples – your taste buds (and your wallet) will thank you!