DIY Garlic Flakes: Unlock Flavor and Convenience at Home
Imagine having a ready supply of pungent, aromatic garlic at your fingertips, without the need for peeling, chopping, or worrying about spoilage. Learning
how to make garlic flakes and dried minced garlic at home isn't just a kitchen hack; it's a game-changer for any culinary enthusiast. This simple dehydrating process transforms fresh garlic into a versatile, long-lasting ingredient, offering superior flavor and purity compared to many store-bought alternatives. Whether you opt for a dehydrator, an oven, or the traditional air-drying method, you're about to embark on a journey that will elevate your cooking and extend the life of your favorite allium. Say goodbye to preservatives and hello to homemade goodness!
Why DIY Garlic Flakes? The Benefits Unveiled
The decision to make your own garlic flakes goes beyond mere novelty; it’s a smart move for your pantry, your health, and your wallet.
- Cost-Efficiency: Buying fresh garlic in bulk is significantly cheaper than purchasing small, often overpriced jars of dried flakes or minced garlic from the spice aisle. Over time, these savings add up, making homemade a truly economical choice.
- Unmatched Purity and Quality: Many commercial dried garlic products contain anti-caking agents, fillers, or other chemicals designed to maintain texture and shelf life. When you make your own, you have complete control over the ingredients – just pure, unadulterated garlic. This not only means a cleaner product but also a noticeably superior flavor profile that fresh dehydration preserves.
- Extended Shelf Life: The primary purpose of dehydrating garlic is to remove its water content. Water is the main culprit behind spoilage, allowing bacteria and mold to thrive. By eliminating moisture, you drastically increase garlic's shelf life, ensuring you always have this essential ingredient on hand, ready for any recipe.
- Superior Flavor: There’s an undeniable difference in taste when you compare freshly dehydrated garlic to its mass-produced counterparts. The homemade version retains a more robust, concentrated garlic essence, providing a deeper and more authentic flavor to your dishes.
- Versatility in Form: Beyond just flakes, you can easily create dried minced garlic for quicker rehydration or even grind them into a homemade garlic powder, offering multiple textures and applications from a single batch.
Essential Preparation: Getting Your Garlic Ready
The success of your homemade garlic flakes hinges significantly on the initial preparation. Taking the time to properly peel and slice your garlic will ensure even drying and optimal results.
Choosing Your Garlic
Start with fresh, firm garlic bulbs. Avoid any that feel soft, are sprouting green shoots, or show signs of mold or bruising. Hardneck varieties often have larger cloves, which can be easier to peel and slice, but any fresh garlic will work beautifully.
Peeling the Cloves
Peeling a large quantity of garlic can be tedious, but there are a few tricks to speed up the process:
- The Smash Method: Place a clove on a cutting board, lay the flat side of a chef’s knife over it, and give it a firm whack with the heel of your hand. The skin will loosen, making it easy to slip off.
- The Bowl Shake: Separate all cloves and place them in two large, sturdy bowls (or two metal mixing bowls). Place one bowl inverted over the other, creating a sealed sphere. Shake vigorously for 15-30 seconds. The friction will cause most of the skins to separate from the cloves.
- Blanching (Optional): For particularly stubborn cloves, a quick 10-15 second dip in boiling water followed by an ice bath can loosen the skins.
Once peeled, ensure all cloves are clean and free from any green sprouts, which can impart a slightly bitter taste.
Slicing for Flakes vs. Mincing for Dried Minced Garlic
The thickness and size of your garlic pieces are crucial for even drying and the final texture.
- For Garlic Flakes: Aim for a uniform thickness between 1/6 and 1/8 inch (approximately 2-3mm). This consistency is vital for all pieces to dry at the same rate. A sharp knife can achieve this with practice, but a mandoline slicer is highly recommended for its precision, speed, and consistent results. Always use the safety guard with a mandoline!
- For Dried Minced Garlic: If you prefer smaller, quicker-rehydrating pieces, a food processor is your best friend. Pulse the peeled cloves in short bursts until you achieve an even mince. Alternatively, a sharp knife can be used to finely chop the garlic by hand. Remember, smaller pieces will dehydrate faster.
Mastering Dehydration: Three Methods Explained
Now that your garlic is prepped, it's time to remove that moisture! Each method offers distinct advantages, catering to different equipment availability and patience levels.
1. The Dehydrator – Precision and Consistency
A food dehydrator offers the most controlled and efficient way to make garlic flakes. It maintains a consistent low temperature, preventing the garlic from cooking while gently removing moisture.
- Process: Arrange your sliced or minced garlic in a single, thin layer on the dehydrator trays. Avoid overcrowding, as this impedes airflow and can lead to uneven drying.
- Temperature & Time: Set your dehydrator to 66°C (150°F). Dehydration typically takes 6-8 hours. In particularly humid environments, it might take closer to 4-6 hours, or even longer in very dry climates.
- Doneness Test: The garlic is ready when it is completely dry, brittle, and snaps easily when bent. There should be no flexibility or chewiness.
- Expert Tips:
- Rotate your trays every few hours to ensure even drying, especially if your dehydrator has hotspots.
- Ensure good ventilation in your kitchen; the aroma of dehydrating garlic can be quite potent!
- Don't be afraid to leave it for an extra hour if it doesn't pass the snap test. It's better to over-dry slightly than under-dry.
2. The Oven – Accessible and Effective
If you don't own a dehydrator, your oven can serve as a capable alternative, though it requires a bit more vigilance.
- Process: Spread your garlic slices or mince in a single layer on baking sheets lined with parchment paper. Parchment prevents sticking and makes cleanup easier.
- Temperature & Time: The key here is a very low temperature. Aim for 54-66°C (130-150°F). If your oven's lowest setting is higher than this, you can still make it work by propping the oven door open a few millimeters with a wooden spoon or a heat-safe silicone spatula. This allows steam to escape and keeps the internal temperature lower, preventing the garlic from baking. Start by baking for 30 minutes, then check hourly.
- Monitoring: Check the garlic every hour. Remove it when it's completely dry and crispy. If it still feels pliable, return it to the oven. Total drying time can range from a few hours to several, depending on your oven's true low temperature and the garlic's thickness.
- Expert Tips:
- Fan-assisted ovens can be beneficial as they circulate air, aiding in more even drying.
- Ensure consistent airflow if you're propping the door open.
- Don't rush the process by increasing the heat; you'll end up with roasted garlic, not dried flakes.
3. Air-Drying – The Traditional, Patient Way
For those who prefer a hands-off, energy-free approach, air-drying is a traditional method that works, albeit requiring more time and specific environmental conditions.
- Process: Arrange your garlic slices or mince in a single layer on baking sheets, clean paper towels, or mesh racks. Place them in a well-ventilated area. Near a window where they can receive some indirect sunlight can be beneficial, but direct, intense sunlight can sometimes "cook" them rather than dehydrate.
- Conditions: This method is best suited for warm, dry environments. Colder or damp conditions will significantly prolong the drying time and increase the risk of mold.
- Time: Air-drying can take anywhere from two to three days, sometimes longer, depending on the thickness of your garlic slices, the ambient temperature, and humidity levels.
- Expert Tips:
- Turn the garlic pieces over at least once or twice a day. This speeds up the drying process and prevents them from sticking to the surface.
- Ensure the area is protected from dust, insects, and pets. A mesh food tent can be helpful.
- If you live in a humid climate, this method may not be practical due to the risk of spoilage before full dehydration.
Storing Your Homemade Garlic Treasures & Maximizing Flavor
Proper storage is key to maintaining the potency and extending the shelf life of your freshly made garlic flakes.
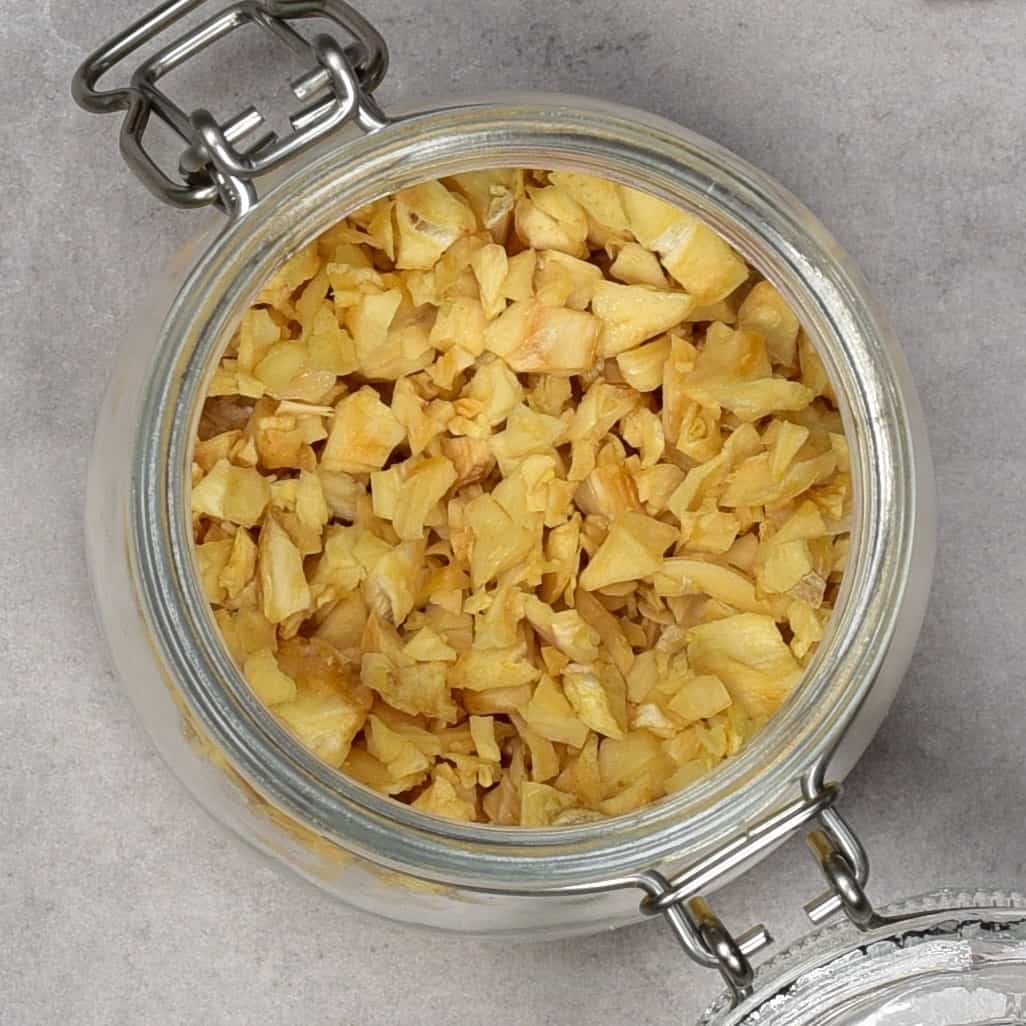
Once your garlic flakes are completely dry and cooled to room temperature (this is critical to prevent condensation), transfer them to an airtight glass jar. Glass is preferred as it's non-reactive and creates an excellent seal. Store the jar in a cool, dry, and dark place, such as a pantry or cupboard. Exposure to light and heat can degrade the flavor and quality over time.
To further combat any residual humidity and prevent clumping, consider adding a tablespoon of uncooked rice or a few dried beans to the jar. These natural desiccants will absorb any excess moisture, keeping your garlic flakes perfectly crisp. While homemade garlic flakes can last for well over a year, their peak flavor and aroma are best enjoyed within the first 6-12 months. After this period, they will still be safe to use but may gradually lose some of their potency.
You can also take your dried garlic a step further! If you've made dried minced garlic, or even your flakes, you can easily transform them into homemade garlic powder. Simply grind them in a clean coffee grinder or a spice grinder until a fine powder is achieved. Sieve out any larger pieces and re-grind for a super-fine powder.
With your fresh supply of homemade garlic flakes and dried minced garlic, you're now equipped to infuse incredible flavor into a myriad of dishes. Sprinkle them into soups, stews, rubs for meats, marinades, salad dressings, or rehydrate them with a little warm water for recipes that call for fresh garlic. The convenience and superior taste will quickly make them a staple in your kitchen.
Learning
how to make garlic flakes and dried minced garlic at home is a rewarding endeavor that offers significant benefits, from cost savings and purity to superior flavor and extended shelf life. By following these simple steps and choosing the dehydration method that suits you best, you can transform fresh garlic into a versatile, long-lasting ingredient that will elevate your culinary creations. Now that you know
Homemade Garlic Flakes & Dried Minced Garlic: 3 Easy Methods, you can
Extend Shelf Life: Make Your Own Flavorful Garlic Flakes & Minced and revolutionize your spice cabinet! Enjoy the unparalleled taste of your homemade garlic treasures!